Table of Contents:
Introduction
The Basics
– Strokes and Fingering
– Strokes
– Fingering
– Barres
– Hand Position
Open Strings and Tuning
– Standard Tuning
– Other Tunings
– Capo
Melody
– Setting Melodies as a Top Voice
– Positions
– Open String Transitions
– Slurring
– Setting Melodies in the Bass
Harmony
– Chord Shaping for Triads
– Chord Shaping for Seventh Chords
– Stock Chords
– Chord Shaping for Stock Chords
– Chord Shaping for Barre Chords
– Setting with the Melody
Strumming and Arpeggios
– Strumming Technique
– Common Arpeggios
Special Effects
– Tremolo
– Harmonics
– Natural
– Artificial
– Percussive Effects
– String Strike
– Wood Strike
– String Rake
Introduction
My name is Dr. B.A. Ferguson, and I am creating this guide as a resource to help composers and arrangers better understand how to write and engrave music for the guitar. Many composers and arrangers I know that are not guitarists have a difficult time writing for the instrument or have described their difficulties to me. I once asked John Corigliano, former Julliard instructor and composer for The Red Violin, what instrument is hardest to write for, and he answered “the guitar” without hesitation. Why is one of the most popular instruments in the world described as the hardest to write for as classically trained composers and arrangers?
Until recently, the guitar was not prioritized in the string family during orchestration courses, which are required for many of these composers. In my orchestration class during my undergraduate degree, the instructor acknowledged that the guitar exists and quickly moved on from that to the harp as a more important instrument. Most of my arrangement knowledge comes from my classical training on the instrument, an assortment of classical guitar studies, and trial and error. While there are an assortment of study books and sightreading resources, there is a lack of resources for arranging for the instrument, aside from the Julian Bream article on the subject in the Guitar Forum publication.
This resource privileges the classical and flamenco guitar, but many of the concepts can apply to other styles. Electric and acoustic players use a pick or plectrum to produce sound, which often reduces the polyphonic capability of the instrument to a heterophonic preference. However, this also depends on the player as many are able to produce notes with other fingers. Since my training is focused on classical polyphonic performance, this resource centers that technique.
The best test for an arrangement is to put it in front a guitarist and get their feedback. This is especially true if you are arranging or composing for a specific guitarist, and this is a good rule for arranging/composing for any performer. For example, you would not want to write outside of the range for a vocalist with a specific range. And, most importantly, be open for feedback from a specific player. I once worked with a composer that was writing for a singer I worked with often, and rather than ask the singer they were writing for, they asked other singers who have completely different ranges. The composer was offended when the singer told them they could not perform the music well and pulled back their work. Don’t be this composer. Talk to your performers and make sure the music is playable for them at the best of their abilities.
I organize this resource into the basics of strokes at the beginning, followed by tuning and transposition techniques. The third section tackles setting a melody, and the fourth covers harmonic writing. Common arpeggios and strumming is covered in the fifth section. Special effects and extended technique is the focus of the sixth section, and I provide suggestions on form in the final section.
Remember, this resource is full of suggestions to make a composition or arrangement idiomatic for the instrument. There is no right or wrong way to arrange for the instrument, but there are some figurations that are not possible or that can do physical damage to the player. Think before you write, and air guitar is always a viable way of checking your work—the imagination is a wonderful tool. Please, enjoy the resource!
The Basics
This guide will assume the player is right-handed; if not, then switch the hand directions throughout. There are a variety of seating positions the player can assume ranging from classical style (footstool or support for the left leg with the guitar at a 45-degree angle from the core of the body) to flamenco style (crossed legs with the guitar resting at an angle on top leg). Standing is also an option for most guitarists, and a strap facilitates this position. Generally, acoustic and electric guitar performers play standing or sitting with both feet flat on the ground with the bout (arc of the body) resting on their right leg. Both hands should facilitate straight wrists with the RH having a slight arch at the wrist (what is sometimes called a house top) to facilitate the pulley mechanisms in the joints.
The guitar is made up of three large parts: the body, the neck, and the headstock, or head. The head houses the tuning pegs (which have many other names such as tuners and machine heads), which are used to tighten or loosen strings to manipulate tuning. A nut is where the strings meet the guitar for the first time from their tuners and starts the neck as well. The neck is made up of the fretboard (or fingerboard) which has metal fret wires laid out vertically through the area. The body is where the strings meet the guitar from the head, and this spot is at the saddle, or bridge. Most acoustic guitars will have a soundhole at the bottom of the fingerboard that allows the instrument to amplify sound. Figure 1 shows the parts of the guitar, and it is part of Wikimedia Commons.

Figure 1 Parts of a Guitar
Guitar is notated in treble clef only, and they do not usually read any other clefs. Even though it is not shown on the sheet music, the guitar sounds an octave lower than what is written. The range of the guitar is from E2 (notated as E3) and usually goes up to B5, but this depends on the guitar (some have more or less high range). Due to some tuning changes, this can change with the possibility of a D2 on the low end. Seven string guitars usually have an extra low string tuned to B1. Players are well versed with reading ledger lines below the staff and up to three ledger lines above the staff; the arranger can use the octave sign for any notes above E5.
Strokes and Fingering
For classical and flamenco players, the player uses their nails as an embouchure to create sound with their right hand (RH) and they use left hand (LH) to manipulate the pitch of the guitar by shortening the length of the string. Attacking the string, or the action of a stroke, is the first topic covered.
Strokes
The RH is often the instigator for sound on the instrument. Each finger is given a label as follows: p for thumb, i for index, m for middle, a for ring, and c for the pinky. These labels come from the Spanish names for fingers (pulgar, indice, medio, anular, and chiquito, respectively). Each finger uses a unique nail shape to come into contact with the string above the soundhole. The p, i, and m fingers make contact where the finger meets the nail, and the a finger makes contact with the string part way through the nail. The c finger is almost never used with exceptions made for strumming or if another finger does not work properly. Figure 2 shows the right hand with its labels.
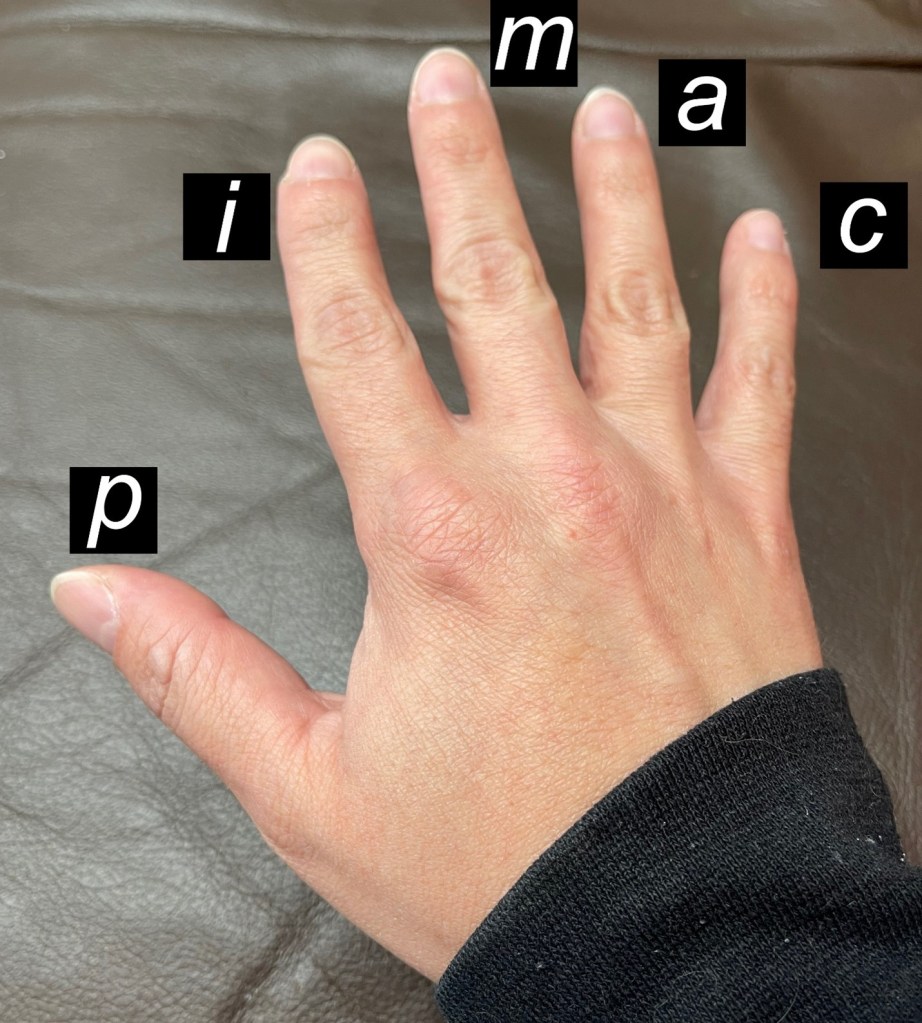
Figure 2 Right Hand Finger Labels
The player will push their finger through the string (not pluck) to attack the string in order to sound a stroke. Most players learn free stroke (or tirando) first, which is following through to their palms. To get a more pronounced sound, the player will perform a rest stroke (or apoyando), which is following through to the string below (physically above) the sounding string. There is no need to specify which stroke since players are individualized by their schools of technique. For example, I learned a mixture in my undergraduate degree while many teachers later opted for free stroke only; this is because the rest stroke does produce unnecessary tension, which is seen as a necessary measure for bringing out the volume of a certain voice in the music.
Fingering
The LH is used to change pitch on each string by pushing down the string with the tip of the finger to the wood of the fretboard on the neck of the guitar. Since this hand holds the guitar, the thumb is used as a support for the pressure of the other fingers when they interact with the strings. The LH also uses finger labels as follows: 1 for index, 2 for middle, 3 for ring, and 4 for pinky. A player can use multiple fingers at once to hold a chord, but this is discouraged in melodic playing as it wastes extra energy. The player pushes down the string right behind the next fret (the name of both the metal part and space between frets). Therefore, the 1st fret is actually the wood area between the nut and the first official fret (wire). Each fret, if closed (or pushing the string down at that fret), raises the pitch by a half step (also called semitone or minor 2nd). Figure 3 shows the LH fingers with their labels.
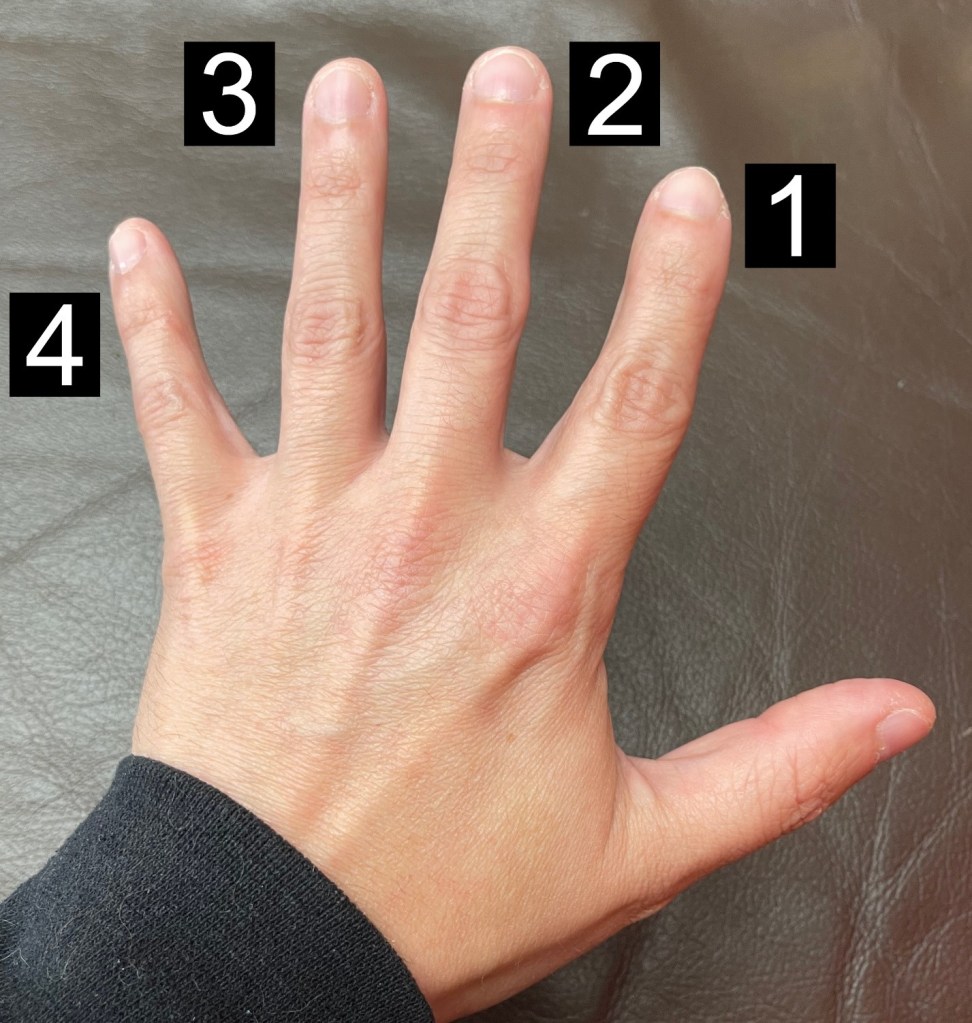
Figure 3 Left Hand Finger Labels
Figure 4 shows the range of most guitars along with tablature. The tablature (TAB) used for guitar represents strings with lines, with the bottom line representing low E and the top representing high E, and numbers to represent which fret is activated with the LH. A zero (0) represents an open string sounding. The TAB for Figure 4 shows where the notes on the staff are on multiple strings; normally, vertical alignment in TAB shows a chord or harmony being performed.
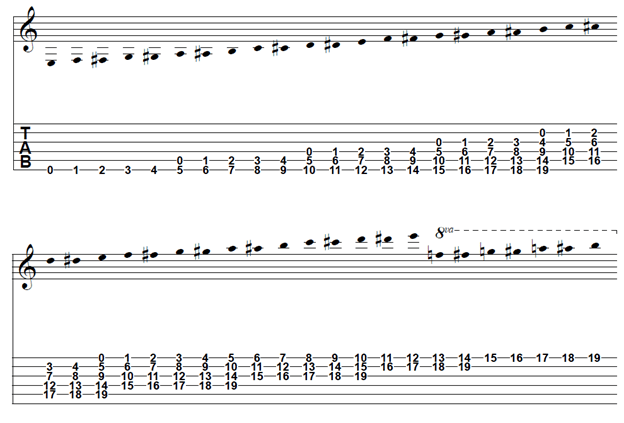
Figure 4 Range of Guitar
Each version of the same note on different strings produces a different timbre. For example, the open high E is thinner in sound than the 5th fret of the B string, or even more so with the 9th fret of the G string. The larger the string, the more rich and full the note sounds. Setting a melody higher on the neck to achieve these richer timbres is a common strategy for arrangers of the classical guitar.
Barres
The LH can also initiate a barre or laying the 1 finger across a fret to simulate a nut at a higher pitch level. This can make complicated harmonies possible at higher pitch levels. However, the barre uses a tremendous amount of energy to achieve. To show a bar in notation, the engraver can put a C symbol (similar to common time signature symbol) with the fret activated shown as a roman numeral. If only three or four strings are activated with the barre, the engrave can show a half barre with the ½ before the C symbol and the roman numeral for which fret is to be activated. Figure 5 show examples of both barres and half barres.

Figure 5 Barres on the Guitar
Hand Position
The RH can manipulate the timbre of the instrument depending on where the hand is positioned. Normal position has the RH above the soundhole with the fingers producing a clear tone. Ponticello (pont. above staff) has the RH near the bridge to create a harsher, thinner sound; this can also be achieved by turning the hand to perform strokes with a straight nail. Tasto (tasto above staff) would be the opposite, which places the RH further into the fingerboard to produce a soft, sweeter sound. A player can also lay the side of their hand near the bridge while playing to produce pizzicato (pizz above staff, sometimes also shown with x noteheads), or a muted sound. This is also called palm-muting in the modern guitar playing world.
Open Strings and Tuning
The guitar has a standard tuning as well as alternate tunings to make some music easier to play. A guitarist typically tunes between each piece in a performance due to the unstable nature of nylon strings (and some steel strings). Very few pieces of music will call for tuning during a piece, and I would recommend not making the player do this. When arranging, it is always good to have the tuning in mind as open strings can ring without needing to keep their fingers on it, unlike closed strings. However, as noted before, some notes that are open are possible as closed notes on other strings (e.g. open B3 can also be played on the fourth fret of the G string), and these closed notes can produce a richer tone than the open alternative. This section will show standard tuning, manipulations to tuning, and how the notes map out on the instrument.
Note: These tunings are based on the Euro-American semitone, equal-temperament system. Quarter-tones are easily produced through tunings and bends, and there are also guitars specialized for quarter-tone composition. This guide does not cover quarter-tones yet.
Standard Tuning
The standard tuning for guitar uses six strings, with strings being both numbered and labeled. The bottom string, which is the highest physically but sounds lowest (thus the name bottom), is the 6th string and is tuned to E2. The fifth string is tuned to A2, the fourth to D3, third is G3, second is B3, and the top string, or first string, is E4. When an arranger wants a specific string performed, they can indicate using the string number in a circle, typically above the note.
As mentioned earlier, closing a fret with a LH finger will raise the pitch. Each fret produces a semitone higher than the previous. Thus, closing off the first fret of the sixth string will produce F2, the second fret produces F#2, and so on. Many guitars have fret markers in the form of dots to show important intervals. Regularly, there will be a dot on fret 7 indicating the perfect 5th above the open pitch, and a double dot at fret 12 to indicate the octave. Figure 6 shows the natural notes from E2 to G4 in open position, which covers the first frets of the instrument. Finger numbers are un-circled and are placed next to the note usually. String numbers are enclosed in a circle above the note.
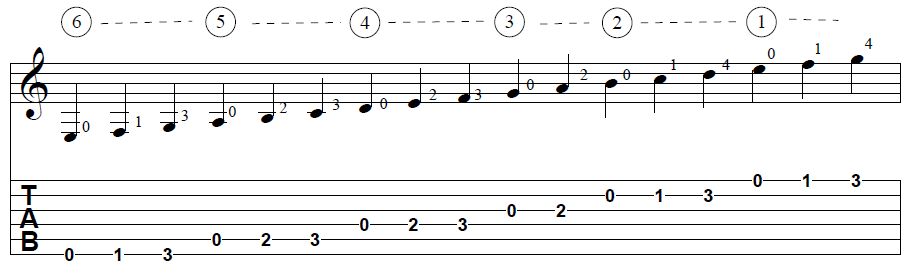
Figure 6 Natural Notes in Open Position
Other Tunings
Popular alternative tunings include Drop D which has the sixth string tuned down a whole step to D2. This can be taken further in DADGAD tuning which shows its tuning from sixth string to first string, meaning the sixth, second, and first strings are each tuned down by a whole step. There is classical precedence for Drop DG tuning which lowers the lowest two strings by a whole step. There is popular precedence to lower all strings by the same interval, and this is usually manifested as dropping all strings by a semitone, which is especially useful for accompanying singers or brass players. Finally, the player can tune the instrument to an open chord such as Open D tuning (DADF#AD) or Open E (EG#BG#BE), which are especially useful for slide guitarists. To show a change of tuning, the engraver needs to put the string number enclosed in circle, the equals sign (=), and the desired note.
From personal experience, I use standard and drop D tuning regularly when performing as a soloist. When performing with a B-flat transposing instrument and reading lead sheets, I drop all strings a whole step to match their transposition. These tunings are especially useful for accessing certain keys, which also means transposing to certain keys makes some music more idiomatic for the instrument. I typically arrange music in a key centering E, A, D, or G. C and F-centered keys are not bad either, but can be tough on the player’s hands due to excessive barring.
Capo
A capo is a device that closes all strings at a specific fret, which can simulate a nut at a higher level on the instrument. This can also help for easy transposing the instrument, although the player can only raise the pitch level with this device. Therefore, if I want a piece to sound in C minor, I usually transpose to A-minor and indicate a Capo 3 at the beginning of the piece. Thus the piece is arranged in A minor but will sound in C minor, which is how Dearly Beloved (from Kingdom Hearts, by Yoko Shimomura) is arranged. With tunings and a capo, most keys become idiomatic for the instrument. One piece I arranged was in E-flat minor, and I had the option of detuning all strings by a semitone (transposing the music up by a semitone to read in E minor) or using a capo on the first fret with Drop D tuning (notated a semitone down in D minor). Since I use standard and Drop D tuning, I opted for the second option. Some toxic performers consider this cheating and believe that the player needs to barre everything, but many of these players develop wrist issues due to too much barring. To show a capo being used, there just needs to be an instruction over the first clef showing ‘Capo’ and the number of the fret to be pushed down with an Arabic number. For example, to capo the first fret, the engrave will indicate ‘Capo 1’.
Melody
Setting melodies for the guitar can be tricky or easy depending on the key. If the melody shares pitches with open strings, then it can be easy to move around the neck using the strings as pivot points. However, if the key is not friendly for the instrument and a capo is not used, then the arranger and performer are limited to a position or two. It is also common to set the melody in the bass while playing harmonies on the higher register of the instrument. This section describes how melodies can work, especially if care is taken in transposition.
Setting Melodies as a Top Voice
When setting a melody, it is important to take note of its tessitura, or range, to strategize where to set it. For example, Battle with Magus (from Chrono Trigger, by Yasunori Mitsuda) is in E minor with a range A3 to E5. Because of how the harmony is set (see next section), the melody sits on one string when the tempo picks up. This allows the player to start from a higher position and work down to open position. Alternatively, the melody for the second section of When Seasons Change (from Romance of the Three Kingdoms, by Yoko Kanno) lies in the first few positions of the instrument. Many times, the accompaniment placement will help determine where the melody could lie, so it is important to keep your options open as an arranger.
Positions
Players typically utilize a position for their LH placement depending on where the notated pitches are on the staff. As mentioned, the open (or 1st) position is for the first four frets of the neck; each finger aligns with the fret it typically closes (1 finger for the 1st fret, 2 finger for 2nd fret, etc.). Moving each of the fingers up to a higher set of four frets (or down if coming from a higher position) activates a position change, and the fret in which the 1 finger aligns determines the position name. So, if the 1 finger is on the 2nd fret, the 2 finger is on the 3rd, and so on, then this would be noted as 2nd position and could be marked with a roman numeral (II) above the staff. Most intermediate players will be comfortable until 9th position. The Battle with Magus (from Chrono Trigger, by Yasunori Mitsuda) melody starts in 9th position, then falls to 7th before finishing in an extended open position (the 4 finger can play one fret higher if needed). Alternatively, Sand Storm (from Gradius III, by Miki Higashino) sits in open position the entire time.
Open String Transitions
The pitches of the open string can allow for a quick position change. This is an old trick of lute players attempting to navigate the unidiomatic lute suites by J.S. Bach. For example, the variations in Passacaglia (from Suikoden, by Miki Higashino) need the open strings to make a smooth transition between positions. A word of caution, it is difficult for the player to align the timbre of open strings since they do not have any closed finger control on these strings; any timbral manipulations are done with the power of the stroke.
Slurring
Like other instruments, the player has the ability to slur with three different techniques for how they want the second (or after) note to sound. This is achieved primarily by performing a stroke on the first note and then activating the next note(s) with the RH on the same string. A player can slur up by hammering a finger on a higher note within a minor 3rd usually, yet it is possible to stretch five semitones with the 4 finger; uncreatively, this is called a Hammer-On. The player can hold multiple notes at once on the same string, and then pull the string down after a RH stroke to activate a lighter LH stroke; this is called a Pull-Off. This can also be performed to an open string. Finally, the player can slide one finger from a note to any other note on the same string to activate a glissando; called a Slide. A slide can be performed from an open string, and it requires the finger Hammer-On a fret or two higher before sliding to the note. Like its use in other instruments, these can allow for smoother lines or different articulations. Figure 7 shows the three different types of slurs and how they are notated.
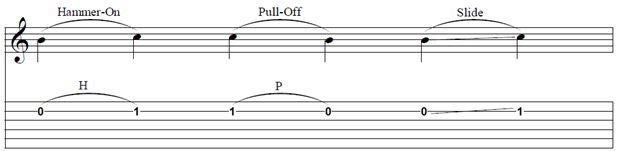
Figure 7 Slurs on the Guitar
Setting Melodies in the Bass
Often, the melody is placed in the low voice, or I will arrange a section of the piece to use the lower, richer strings on the instrument. In later sections, a player can perform arpeggios or other special techniques while bringing out the bass for a melody or counter-melody. The player will use their p finger to perform these strokes on the RH, and the player will need to take in careful consideration when it comes to the LH and its positioning. For Passacaglia (from Suikoden, by Miki Higashino), I perform the melody in both low and high registers in different RH positions to show the dynamic and timbral ranges of the guitar.
Harmony
The guitar has an inherent ability to allow for harmonic playing. The player can strike up to six notes at a time simultaneously. However, there must be careful consideration for how these harmonies are executed in both hands. In the RH, the player can activate four strings with normal strokes, but anything with five or six voices will need to be strummed. The player can roll strokes easily to give a broken chord sound. In the LH, the player can use four fingers, but its range between notes can be limited.
My training included jazz guitar, which two teachers gave me the initial assignments of finding all harmonies in each of their inversions across the instrument. Having instant access to all chord shapes for triads and seventh chords allowed me to move through each harmony naturally when writing for the guitar. For the most common shapes, I have provided the following guides to show how they can move from one to another.
Chord Shaping for Triads
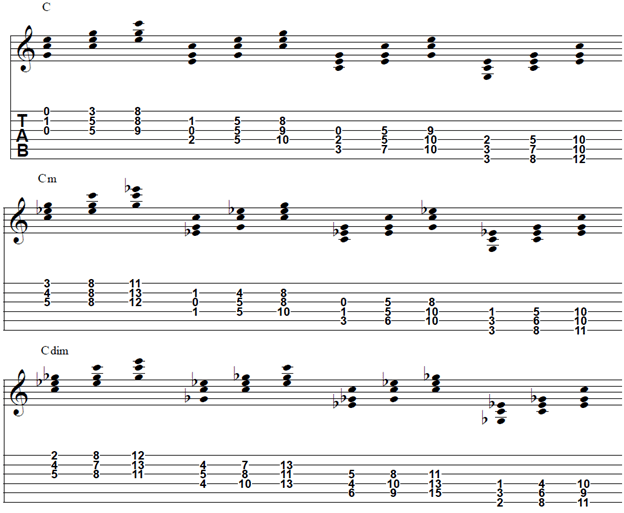
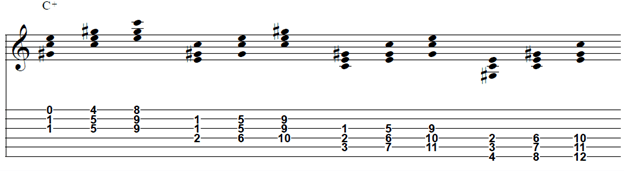
Figure 8 Triads in all Inversions in C
Chord Shaping for Seventh Chords
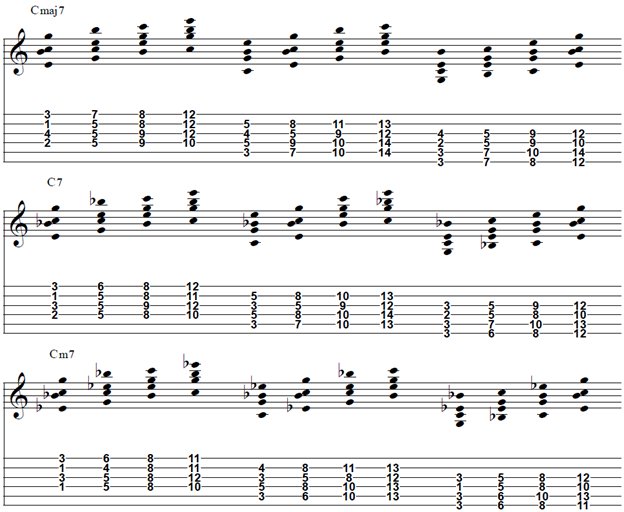
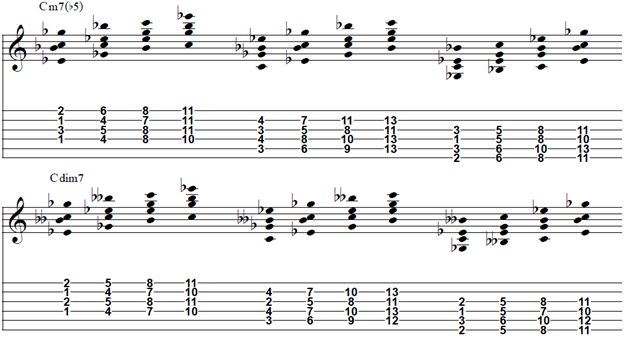
Figure 9 Seventh Chords in All Inversions in C
Stock Chords
There are also an assortment of stock chords any guitarist learns that are in two categories: open and barred chords. Open chords only allow for a few harmonies, but a capo can allow for easy transpositions while using these chords. Barred chords are much tougher to hold for the performer, and any harmony is available depending on how they are fingered. The barred chords have two subcategories which are dictated by the lowest note, which is always the root in barred chords, and which string they are on: the 5th or 6th string. The diagrams below shows these chords and their voicings.
Chord Shaping for Stock Chords
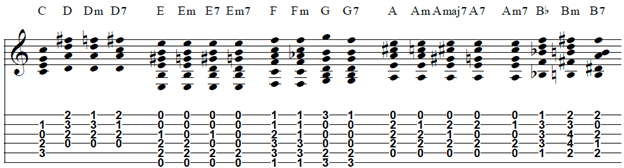
Figure 9 Stock Chords on the Guitar
Chord Shaping for Barre Chords
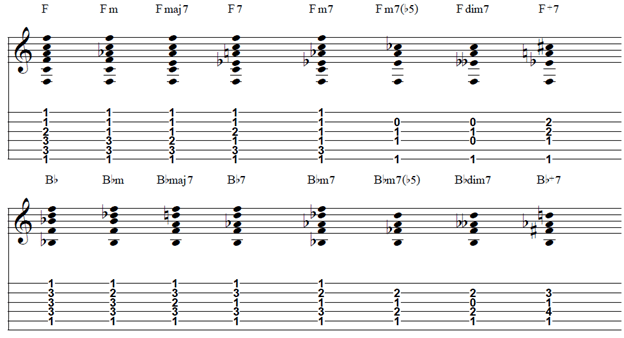
Figure 10 Stock Barre Chords on the Guitar
Setting with the Melody
While the inversion in which a player performs these chords are important, it is more important to let the melody guide the arranger into which shapes to use. For Winters White (from Earthbound, by Keiichi Suzuki and Hirokazu Tanaka), I use an assortment of positions to activate the melody while continuing accompaniment with a mixture stock and voiced chords. Setting the bass and middle voice melody pushed for accompaniment with more open strings. The Theme of Love (from Final Fantasy IV, by Nobuo Uematsu) primarily relies on voiced and stock barre chords allow for the melody to shine in the high register.
Strumming and Arpeggios
Strumming Technique
While strumming (or rasgueado) with a pick is fairly straightforward, there are an assortment of different strumming styles for fingerstyle. The classical players usually use their p or i finger to quickly play needed strings diagonally through the sound hole, and they can do up or down strums with these two fingers. Flamenco players often use classical style or an all finger, open hand stroke (including the c finger) to give an emphasis. A common triple meter pattern uses open hand stroke for the first beat, a thumb down strum on the second, and a thumb up strum on the last beat.
For Mainframe (from /reality, by Chase Bethea), I utilize regular simultaneous strokes to activate the harmony throughout. I use an i finger strumming style for Battle for Magus (from Chrono Trigger, by Yasunori Mitsuda) during the climatic section.
Common Arpeggios
Fingerstyle guitar allows for easy access to perform arpeggios of many different varieties. Mauro Giuliani wrote the120 studies for the right hand that outlines most of the possible finger combinations using a C – G7 chord progression in open position. There are examples of producing the melody in the bass and high voice throughout all guitar literature, and even some that manage to produce a melody in the middle voices.
I employ the melody of the “Dragon Theme” in the high voice for a To A Distant Place (from Breath of Fire III, by Yoshino Aoki and Akari Kaida) with a descending arpeggio (a – m – i). To accentuate the harmony throughout Taiga (from Deity Quest, by Chase Bethea), I employ a similar arpeggio employed by Leo Brouwer in his Estudios Sencillos.
Special Effects
Tremolo
Aside from electric guitar, the guitar does not produce sustaining notes. While not as short as a marimba, the decay happens over about 5-10 seconds depending on the quality of instrument. To combat this, players can activate a tremolo effect to repeat a note rapidly to emulate a sustained note. With a pick, this is usually done with a rapid up and down stroke called alternate picking, but for fingerstyle, the player has two options: traditional tremolo or flamenco alzapua. Traditional tremolo is used in both classical and flamenco styles, and it involves the p finger performing a bassline while the other fingers, usually in the order of a – m – i, fills in the rhythmic gaps between notes. The alzapua is a quick up and down stroke with the p finger to emulate tremolo in a purely melodic sense.
I employ traditional tremolo throughout Tree of Peace (from I Can’t Escape: Darkness, by Chase Bethea).
Harmonics
Like other string instruments, overtones can be activated in the form of harmonics. On the guitar, this will come out as a soft bell like sound. There are two types: natural and artificial.
Natural
Natural harmonics on the guitar occur at every fret of the guitar, but are most clear on the 5th, 7th, 12th, 17th and 19th frets. These typically use both hands to activate. The LH finger barely touches the string above the fret wire, and it lifts after the note is activated with the RH stroke. This can also be done with one hand by using the i finger to barely touch the fret wire while the p performs the stroke, but this technique is always going to be softer than using two hands.
Artificial
To clearly provide harmonics at any level, the player can use the one handed technique on any note (open notes included) at 12 frets above the needed fret. Like the player producing the natural harmonic with one hand on the 12th fret of the high E string for the E harmonic, the player can push down the 1st fret of that same string and perform the one handed harmonic on the 13th fret to produce an F harmonic. There are many examples of classical guitar literature that utilizes a harmonic melody with both artificial and natural harmonics while also performing non-harmonic accompaniment by changing technique (usually still played tasto). Figure 11 shows example of 12th fret natural harmonics and the first several artificial harmonics on the high E string (note: the first E in the second section is not an artificial harmonic).

Figure 11 Natural and Artificial Harmonic Examples on the Guitar
I employ both types of harmonics in several pieces including one of the melodic settings of Tree of Peace (from I Can’t Escape: Darkness, by Chase Bethea)
Percussive Effects
The guitar also allows for different percussive techniques that can add even more depth to your arrangements and compositions for the instrument.
String Strike
The tambora technique involves using the RH to strike strings rather than playing the notes. This is usually done with a chord as an accent. I employ a tambora at the beginning and last chord of Sand Storm (from Gradius III, by Miki Higashino).
Wood Strike
The player can also produce a drum sound by tapping on the side or saddle of the guitar. The saddle usually produces a bass sound while tapping on the side produces a higher drum sound.
String Rake
The last technique involves the player rubbing their RH on all the strings to give a soft tremolo effect. While this is rarely performed on a solo piece, it is an effective guitar ensemble tool.
